Setting Up Phone Numbers & SIP Trunks
Learn how to purchase phone numbers, assign AI agents, or connect your own SIP trunk to handle inbound and outbound calls in VINSI.AI.
Created September 18, 2025 · Updated September 16, 2026
Phone Numbers
VINSI.AI allows you to purchase and manage phone numbers directly from the dashboard. Open Phone Numbers in the AI Phone Agent product (it is also available under CRM → Admin → Phone Numbers). The page subtitle reads "Manage your phone numbers and agent assignments".
The table lists Phone Number, Trunk, Agent, Date Added, and Actions. Use the search box ("Search by phone number or agent...") to find a number. The Trunk badge shows your own trunk name, or VINSI.AI AGENT, VINSI.AI PHONE, or VINSI.AI FAX.
- Click
 to purchase a new phone number
 - Enter a 3-digit Area Code
- Click Search Available Numbers
- Optionally narrow the results with "Filter by city or state…"
- Click a number, then click Subscribe & Buy ($3/mo)
- Complete the Stripe checkout. Once purchased, the phone number will appear in the phone numbers table
Numbers cost $3/month each, and you can cancel anytime. Buttons on this page require an organization admin or the phone_numbers write permission.
Assign AI Agent
A number doesn't have to be assigned to an AI agent—it can also be a member's line, a hunt group, a queue, or a fax number. See Phone Numbers for those uses. To have an AI agent answer a number:
- Locate the phone number in the phone numbers table
- Use the dropdown in the Agent column
- Select the AI agent you want to assign (choose No Agent to clear it)
- The selected agent will now manage calls for that number
Note: If the number is already in use, you'll see "This number is in use". Click Assign agent anyway to assign it regardless.
Number Actions
| Action | Notes |
|---|---|
| Edit SIP Trunk | Manually configured SIP trunks |
| Set Caller-ID Name (CNAM) | Telnyx numbers |
| Repair routing | Telnyx numbers with an agent assigned |
| Release Phone Number | Paid numbers also cancel their subscription. Unassign the agent first. |
Using Your Own SIP Trunk
If you prefer to use your own SIP infrastructure instead of purchasing a phone number, you can connect a SIP trunk.
- Click
 from the Phone Numbers section
 - Fill in the Configure SIP Trunk fields:
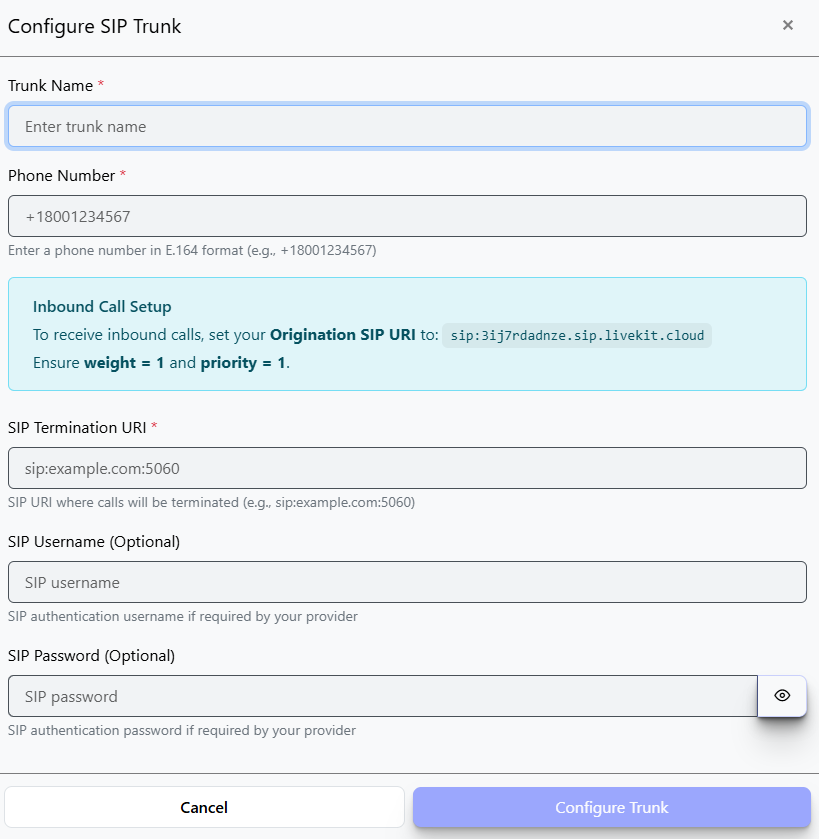
- Trunk Name (required) — a label to identify this SIP trunk in your account
- Phone Number (required) — enter the number in E.164 format (e.g.
+18001234567) - Inbound Call Setup — to receive inbound calls, set your Origination SIP URI at your provider to the URI shown in the modal, with weight = 1 and priority = 1
- SIP Termination URI (required) — the SIP URI where outbound calls will be terminated (e.g.
sip:example.com:5060) - SIP Username / SIP Password (optional) — credentials if your provider requires authentication
- Click Configure Trunk to save and activate the SIP trunk
To change a trunk later, use Edit SIP Trunk and click Save Changes. Leave the password blank to keep the current one.
For more details, see the related article: Elastic SIP Trunking With Twilio.