Batch Call
Run outbound call campaigns that reach a large contact list automatically using AI-powered phone agents.
Ready to launch a batch call campaign?
Click here to see how to set up a batch call — step by step.
Created: June 3, 2025
Updated: September 16, 2026
Overview
A batch call dials a list of recipients with one of your outbound AI agents. You can send the calls right away, schedule them for specific days and times, or spread them out over time with progressive pacing and automatic retries.
Getting Started
Prerequisites:
- An AI agent with outbound configured. See Outbound Calls.
- A phone number assigned to that agent that can call out. See Phone Numbers.
To open Batch Calls:
- Open the AI Phone Agent product.
- In the top navigation, select Batch Calls (
/batch-calls). - Click New Batch Call to open the Create Batch Call form.
Batch Calls List
The Batch Calls page ("Manage outbound call campaigns") lists every campaign in your organization. Use the Search by name, agent or phone... box to find a batch.
| Column | Description |
|---|---|
| ID | Batch identifier, e.g. B-123. |
| Name | The batch call name. |
| Phone Number | The caller ID used for the calls. |
| Agent | The outbound AI agent placing the calls. |
| Start At / End At | The scheduled date range. |
| Time / End Time | The daily start and end times. |
| Scheduled Days | The weekdays the batch runs on. |
| Status | Scheduled, Running, Completed, or Canceled. |
| Progress | How far the batch has progressed through its recipients. |
| Actions | Row actions (see below). |
Row actions:
- Edit Batch Call — you can also click the row.
- View Contacts — see each recipient and its send status.
- View call tracking — available for batches that use progressive pacing only.
- Delete Batch Call
Editing or deleting a batch call requires an organization admin or the batch_calls write permission.
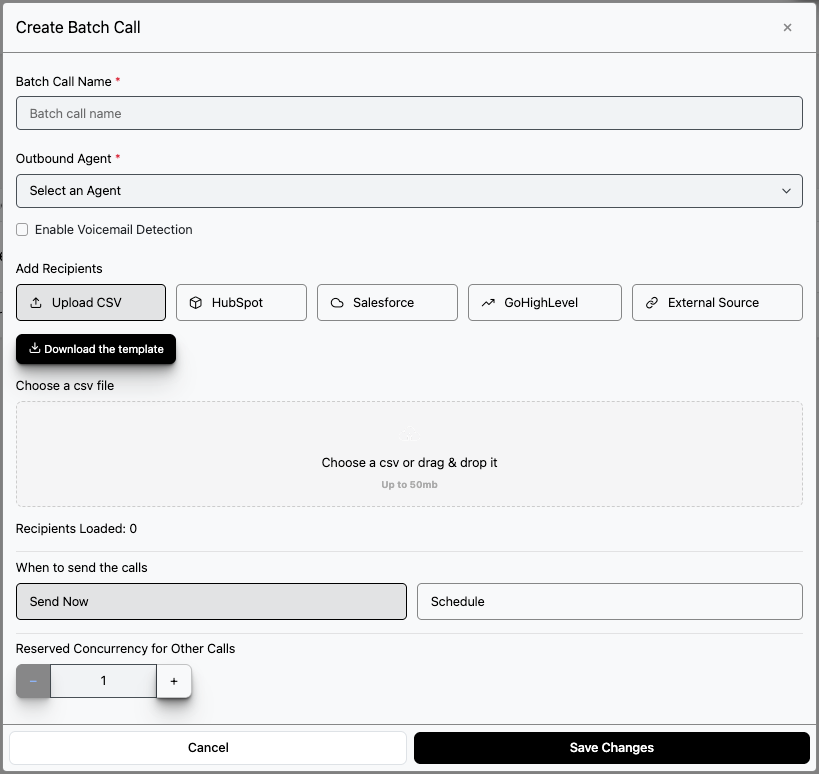
Create Batch Call Form
The form fields appear in this order:
- Batch Call Name (required).
- Outbound Agent (required, "Select an Agent"). Each option is a phone number shown as Agent Name - (xxx) xxx-xxxx. Picking one sets both the agent and the caller ID. Only numbers with an assigned agent and outbound capability appear.
- Enable Voicemail Detection (off by default). When checked, a Voicemail Message text box appears.
- Add Recipients — Upload CSV (default), HubSpot, Salesforce, GoHighLevel, VinsiSaaS CRM, or External Source. See Recipients.
- When to send the calls — Send Now (default) or Schedule. See Scheduling.
- Spread calls over time (progressive pacing) — available for one-time batches only (no weekdays selected). See Progressive Pacing.
- Reserved Concurrency for Other Calls — stepper, default 1, minimum 1, maximum 5.
Form footer buttons:
- Warm up agent (optional) — pre-loads the agent so it is ready in about 5–10 seconds.
- Save Batch Call
Recipients
Choose a source under Add Recipients:
- Upload CSV (default)
- HubSpot
- Salesforce
- GoHighLevel
- VinsiSaaS CRM
- External Source
Upload CSV
- Click Download the template to get
template.csv. Its headers are exactlyname,phoneNumber. - Click Choose a csv file and select a
.csvfile (up to 50mb). - Review the file in the editable grid. Use Add column and Add row to add data, and right-click to delete a row or column. The
nameandphoneNumbercolumns can't be deleted. - Click Save CSV changes. Saving is blocked while any header or cell is empty.
- Confirm the Recipients Loaded: N count matches your list.
Extra columns become per-recipient variables for the agent. Avoid commas inside values.
HubSpot
Select HubSpot under Add Recipients.
If HubSpot isn't connected yet, click Connect to HubSpot (Settings → HubSpot).
Batch Call Form
- Once connected, choose a Pipeline and Stage (both required).
- Click Fetch Contacts. The form shows Contacts imported: N.
Salesforce
- Select Salesforce under Add Recipients and click Connect to Salesforce if needed.
- Choose the Object Filter.
- Click Add Filter to add filter rows. Each row has Field, Operator, Parameter, and Remove. Operators: Equals, Not Equals to, Greater Than, Less or equals, Greater or equals, Includes.
- With two or more filters, enter Filter Logic (for example
1 and 2) and click Apply. - Set Include Do Not Call Clients to Yes or No (default No).
- Click Get Contacts from {object} to load contacts. Use Save Filter to keep the filter.
GoHighLevel
- Select GoHighLevel under Add Recipients and click Connect to GoHighLevel API if needed.
- Click Get Contacts and select the contacts to call.
- The form shows Contacts selected: N.
GoHighLevel requires the agent's GoHighLevel Sub-Account ID to be set in the agent's Integration section.
VinsiSaaS CRM
- Select VinsiSaaS CRM under Add Recipients and click Connect to Vinsi CRM API if needed.
- Click Add Contacts to open Contacts from CRM (Contact, Title, Phone, Email).
- Tick the contacts you want and click Add Contacts.
External Source
- Select External Source under Add Recipients.
- Fill in the request settings: server URL (required), method, headers, parameters, and timeout.
- Click Execute request.
Warning: Dialing phone numbers automatically without prior consent violates FCC regulations and may result in penalties.
Scheduling
Under When to send the calls, Send Now is the default. Choose Schedule to set:
- Start Date (required, today or later)
- Has End Date — reveals End Date
- Start Time and End Time (required)
- Select Time Zone (required)
- Select the days — Mon through Sun, within the date range
Progressive Pacing
Check Spread calls over time (progressive pacing) to dial in waves instead of all at once. Pacing is available for one-time batches only (no weekdays selected).
| Setting | Default | Description |
|---|---|---|
| Contacts per wave | 50 | How many contacts are dispatched in each wave. |
| Every (minutes) | 60 | Time between waves. |
| Only dispatch within a daily time window | 09:00–18:00 | Uses the batch time zone. Contacts outside the window wait; they are not skipped. |
| Distribute by day of week | Optional | Click Add day and set a weekday and quota. |
| Retry if disposition is | Empty | Comma-separated dispositions, e.g. No Answer, Voicemail, Busy. Leave empty for no retries. |
| Retry after (hours) | 2 | Delay before a retry. |
| Max attempts per contact | 2 | Upper limit on attempts for each contact. |
When using day-of-week rules, choose what happens when a contact was already attempted on an earlier rule day:
- Distribute — each contact is called once.
- Repeat — on repeat days, choose Only retry contacts who didn't answer (recommended) or Call everyone again.
Monitoring
While a batch is running, the form shows "The batch call is executing..." with a progress bar and a Cancel Execution button. Save Batch Call is disabled while the batch runs.
Batches can't be paused — only canceled.
View Contacts shows each recipient with a status of Sent, DNC Skipped, or Error.
View call tracking (pacing batches only) shows each contact's progress. Filter by status: Pending, Queued, Dispatched, Answered, No Answer, Retry Scheduled, DNC, Max Attempts, Error.
| Column |
|---|
| Name |
| Phone Number |
| Status |
| Attempts |
| Wave |
| Last Disposition |
| Last Attempt |
| Next Attempt |
Results & Reports
- Call Logs — filter by Batch and use Export.
- Dashboard — filter by batch (
B-###). - Dashboard → Reports — Batch Campaign Summary and Batch Call Detail, both with Export to Excel.
Do Not Call
Numbers listed in CRM Admin → Do Not Call Registry are skipped and show as DNC Skipped in View Contacts.